새로운 강의는 이제 https://memi.dev 에서 진행합니다.
memi가 Vue & Firebase로 직접 만든 새로운 사이트를 소개합니다.
모던웹(NEMV) 혼자 제작 하기 3기 - 25 API와 프론트 통신 정리
지난 강좌에 이어서 CRUD 중 UD 즉 수정, 삭제를 해보겠습니다.
수정, 삭제의 경우 선택이 필요한 것이기 때문에 리스팅된 UI가 필요 합니다.
뭔가를 선택해서 수정이나 삭제를 해야되는 것이죠..
추가 버튼 생성
fe/src/views/user.vue
  <v-btn
    absolute
    dark
    fab
    bottom
    right
    color="pink"
    @click="mdUp"
  >
    <v-icon>add</v-icon>
  </v-btn>
</v-layout>
둥둥 떠있는 플로팅 액션버튼(fab)을 만듭니다. 배치에 상관이 없으니 v-layout 위정도면 됩니다.
참고: https://vuetifyjs.com/ko/components/floating-action-buttons
버튼 눌렀을 때 켜질 다이얼로그 만들기
원하는 이름과 나이를 쓸 수 있는 다이얼로그를 만듭니다.
fe/src/views/user.vue
    </v-layout>
    <v-dialog v-model="dialog" persistent max-width="500px">
      <v-card>
        <v-card-title>
          <span class="headline">User Profile</span>
        </v-card-title>
        <v-card-text>
          <v-container grid-list-md>
            <v-layout wrap>
              <v-flex xs12 sm6 md4>
                <v-text-field
                  label="Legal last name"
                  hint="example of persistent helper text"
                  persistent-hint
                  required
                  v-model="userName"
                ></v-text-field>
              </v-flex>
              <v-flex xs12 sm6>
                <v-select
                  :items="userAges"
                  label="Age"
                  required
                  v-model="userAge"
                ></v-select>
              </v-flex>
            </v-layout>
          </v-container>
        </v-card-text>
        <v-card-actions>
          <v-spacer></v-spacer>
          <v-btn color="blue darken-1" flat @click.native="dialog = false">Close</v-btn>
          <v-btn color="blue darken-1" flat @click="postUser">Save</v-btn>
        </v-card-actions>
      </v-card>
    </v-dialog>
참고: https://vuetifyjs.com/ko/components/dialogs
v-layout 아래 다이얼로그를 만들어 놓습니다.
버튼으로 다이얼로그 띄우기
html코드에 연결 시킬 스크립트를 작성합니다.
fe/src/views/user.vue
<script>
export default {
  data () {
    return {
      users: [],
      getMd: '',
      postMd: '',
      putMd: '',
      delMd: '',
      dialog: false,
      userAges: [],
      userAge: 0,
      userName: ''
    }
  },
  mounted () {
    for (let i = 10; i < 40; i++) this.userAges.push(i)
  },
  methods: {
    mdUp () {
      this.userName = ''
      this.userAge = ''
      this.dialog = true
    },
  }
}
</script>
- 처음 시작할 때 for를 돌려서 userAges에 10~39살까지 채웁니다.
그러면 v-select에 items에 연결되어 있기 때문에 값이 자동으로 들어가 있습니다. - 위의 버튼을 누르면 mdUp이 호출 되면서 값을 초기화하고 다이얼로그를 띄우게 됩니다.
- 각 입력값들은 v-model에 연결되어 동기화됩니다.
팝업 메세지 띄우기
동작 결과를 보기위해 알림과 확인용 콤포넌트인 스낵바를 만들어 보겠습니다.
참고: https://vuetifyjs.com/ko/components/snackbars
fe/src/views/user.vue
  <v-snackbar
      v-model="snackbar"
    >
      {{ sbMsg }}
      <v-btn
        color="pink"
        flat
        @click="snackbar = false"
      >
        Close
      </v-btn>
  </v-snackbar>
</v-container>

  data () {
    return {
      snackbar: false,
      sbMsg: '',
    }
  },
  methods: {
    pop (msg) {
        this.snackbar = true
        this.sbMsg = msg
    }
  }
v-container위에 v-snackbar를 만들어 두고 snackbar라는 변수도 선언 해둡니다.
이제 snackbar는 true 면 뜨고 false면 없어집니다.
sbMsg를 머스태그로 넣어두고 콘솔로그 대신에 this.sbMsg 값을 조작하면 되는 것이죠.
그래서 pop이란 함수를 만들어 놓았습니다.
값 추가하기
위에 다이얼로그에서 눌렀을 때 전송될 함수를 작성합니다.
fe/src/views/user.vue
    postUser () {
      this.dialog = false
      axios.post('http://localhost:3000/api/user', {
        name: this.userName, age: this.userAge
      })
        .then((r) => {
          this.pop('사용자 등록 완료')
        })
        .catch((e) => {
          this.pop(e.message)
        })
    },
값(리스트) 읽어보기
fe/src/views/user.vue
    <v-layout row wrap>
      <v-flex xs12 sm6 md4 v-for="user in users" :key="user._id">
        <v-card>
          <v-card-title primary-title>
            <div>
              <h3 class="headline mb-0">{{user.name}}</h3>
              <div>{{user.age}}</div>
            </div>
          </v-card-title>
        </v-card>
      </v-flex>
    ...

// 함수
  mounted () {
    for (let i = 10; i < 40; i++) this.userAges.push(i)
    this.getUsers()
  },
  methods: {
    getUsers () {
      axios.get('http://localhost:3000/api/user')
        .then((r) => {
          console.log(r.data)
          this.users = r.data.users
        })
        .catch((e) => {
        this.pop(e.message)
        })
    },
  }
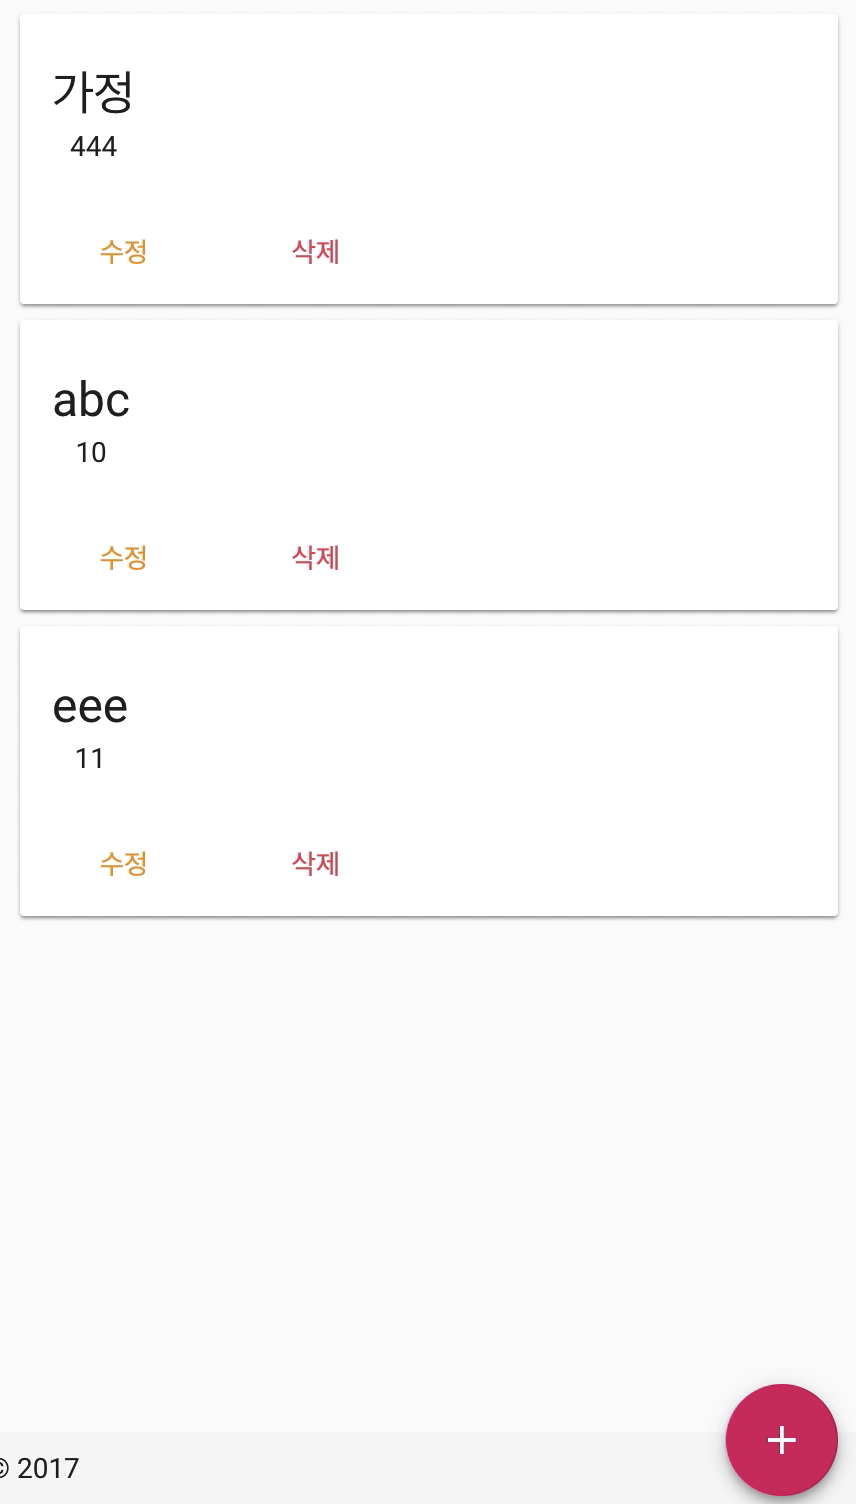
- 시작시 this.getUsers()로 전체 리스트를 읽어옵니다.
- v-for로 users를 개수만큼 표현하는데 이 때 :key에 _id를 넣었습니다. :key는 값이 모두 달라야합니다.
- 그리고 카드의 위치를 아무데나 잡고 머스태그에 이름과 나이를 표시했습니다.
값 수정과 삭제 해보기
수정과 삭제 모두 선택된 값을 기준으로 하게 됩니다.
수정의 경우 선택후 입력값도 넣어야 되기 때문에 기존 다이얼로그를 재활용 합니다.
fe/src/views/user.vue
<template>
  ...
          </v-card-title>

          <v-card-actions>
            <v-btn flat color="orange" @click="putDialog(user)">수정</v-btn>
            <v-btn flat color="error" @click="delUser(user._id)">삭제</v-btn>
          </v-card-actions>
  ...
  <v-dialog v-model="dialog" persistent max-width="500px">
        ...
          </v-card-text>
          <v-card-actions>
            <v-spacer></v-spacer>
            <v-btn color="blue darken-1" flat @click="putUser">수정</v-btn>
            <v-btn color="blue darken-1" flat @click.native="dialog = false">Close</v-btn>
            <v-btn color="blue darken-1" flat @click="postUser">Save</v-btn>
          </v-card-actions>
        </v-card>
      </v-dialog>
</template>
<script>
export default {
  data () {
    return {
      userAge: 0,
      userName: '',
      putId: ''
    }
  },
  methods: {
    putDialog (user) {
      this.putId = user._id
      this.dialog = true
      this.userName = user.name
      this.userAge = user.age
    },
    putUser () {
      this.dialog = false
      axios.put(`http://localhost:3000/api/user/${this.putId}`, {
        name: this.userName, age: this.userAge
      })
        .then((r) => {
          this.pop('사용자 수정 완료')
          this.getUsers()

        })
        .catch((e) => {
          this.pop(e.message)
        })
    },
    delUser (id) {
      axios.delete(`http://localhost:3000/api/user/${id}`)
        .then((r) => {
          this.pop('사용자 삭제 완료')
          this.getUsers()
        })
        .catch((e) => {
          this.pop(e.message)
        })
    },
  }
}
</script>
수정 동작은 이렇습니다.
- 리스트에 나온 수정 버튼을 누름
- 누르면 putDialog에 선택된 유저를 넘김
- 다이얼로그 띄우고 putId라는 값에 해당 유저의 _id를 보관해 놓음 그리고 입력폼에 선택된 유저의 이름과 나이 넣어줌
- 다이얼로그에 있는 putUser 버튼으로 선택값인 putId와 이름과 나이 보냄
다이얼로그라는 매개가 있어서 괜히 좀 복잡해 보입니다..
그에 반해 카드에 있는 삭제 동작은 버튼으로 바로 이루어지 때문에 간단합니다.
API 수정, 삭제 만들기
해당 유저가 들어가도록 가변 파라메터를 적용합니다.
router.put('/:id', (req, res, next) => {
  const id = req.params.id
  const { name, age } = req.body
  User.updateOne({ _id: id }, { $set: { name, age }})
    .then(r => {
      res.send({ success: true, msg: r })
    })
    .catch(e => {
      res.send({ success: false, msg: e.message })
    })
  // res.send({ success: true, msg: 'put ok' })
})

router.delete('/:id', (req, res, next) => {
  const id = req.params.id
  User.deleteOne({ _id: id })
    .then(r => {
      res.send({ success: true, msg: r })
    })
    .catch(e => {
      res.send({ success: false, msg: e.message })
    })
  res.send({ success: true, msg: 'del ok' })
})
- /:x 는 req.params.x 가 됩니다.
eg) /api/user/xvv -> req.params.x 는 xvv 입니다.
실행 결과

마치며
이것으로 기본편을 마칩니다.
기본이라는 것은 물리적으로 화면에서 디비까지 잘 구동할 수 있는 정도인 것이죠.
영상
좀 많이 버벅였는데요.. 특히 에디터 때문에 짜증이 계속 났는데 사실 에디터 잘못이 아닙니다. 제 잘못일 뿐..
개발자의 고뇌를 보고 싶지 않은 분은..20~30분 구간 스킵해주세요~

댓글남기기