새로운 강의는 이제 https://memi.dev 에서 진행합니다.
memi가 Vue & Firebase로 직접 만든 새로운 사이트를 소개합니다.
NEMBV 5 Back-end api route
이 강좌는 종료되었습니다.
새로운 강좌로 시작하세요~
모던웹(NEMV) 제작 강좌
프론트엔드에서 동기적으로 데이터에 따른 페이지 변화를 주기 위해 api 서버를 만들기로 한다.
우선 불필요한 파일들을 싹 정리해보았다.
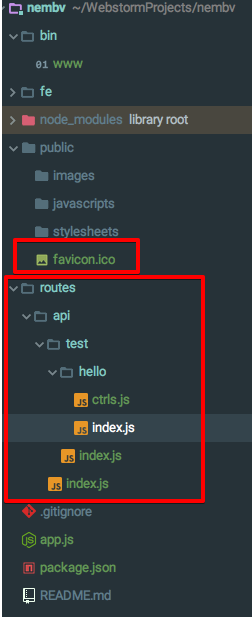
public/favicon.ico를 하나 추가하였고 routes/api 디렉토리를 계층적으로 생성한것을 볼 수 있다.
app.js
var express = require('express');
var path = require('path');
var favicon = require('serve-favicon');
var logger = require('morgan');
var cookieParser = require('cookie-parser');
var bodyParser = require('body-parser');

var app = express();

app.use(favicon(path.join(__dirname, 'public', 'favicon.ico')));
app.use(logger('dev'));
app.use(bodyParser.json());
app.use(bodyParser.urlencoded({ extended: false }));
app.use(cookieParser());
app.use(express.static(path.join(__dirname, 'fe', 'dist')));
app.use(express.static(path.join(__dirname, 'public')));

app.use('/api', require('./routes/api'));

// catch 404 and forward to error handler
app.use(function(req, res, next) {
  var err = new Error('Not Found');
  err.status = 404;
  next(err);
});

// error handler
app.use(function(err, req, res, next) {
  // set locals, only providing error in development
  res.locals.message = err.message;
  res.locals.error = req.app.get('env') === 'development' ? err : {};

  // render the error page
  res.status(err.status || 500);
  res.send({ success: false, msg: err.message });
});

module.exports = app;
- 파비콘이 없으면 없으면 약간의 버벅임 때문에 favicon을 등록해두는 것이 좋다. 브라우저는 웹을 뒤지기 전에 주로 파비콘부터 찾기 때문이다.
app.use(favicon(path.join(__dirname, 'public', 'favicon.ico'))); - 다른 라우트 포인트는 다 비우고 api만 남겼다.
app.use('/api', require('./routes/api')); - 그외 페이지 없음은 기존에는 error.pug를 렌더링 했지만 api 요청이기 때문에만 써야할 내용만 남겼다.
res.send({ success: false, msg: err.message });
routes/api
website 에서 루트(/) 를 지정하면 index.htm, index.html, default.html 등을 찾아 표시하듯
/routes/api를 use 선언한다고하면 하부 디렉토리에서 index.js를 찾아서 실행하게된다.
- api/index.js
const router = require('express').Router();

const test = require('./test');

router.all('*', (req, res, next) => {
  console.log(req.path + ' welcome to api');
  // 미들웨어가 들어갈 곳
  next();
})

router.use('/test', test);

router.all('*', (req, res) => {
  res.status(404).send({ success: false, msg: `unknown uri ${req.path}` });
});
module.exports = router;
localhost:3000/api 로 들어 올 경우 모든 요청에 서버 콘솔로 welcome to api를 적는다
여기서 중요한 것은 라우팅은 순차적으로 일어나며 next()가 없을 경우 서버는 갈곳을 잃기 때문에 에러가 난다.
추후 api로 들어오는 요청을 판단하고 넘겨줄 미들웨어가 있을 자리가 된다.
그 중 localhost:3000/api/test 는 하위 api/test 에서 처리한다
localhost:3000/api/abcd 등 test가 아닌 경우 성공 실패와 이유가 담긴 json을 리턴한다.
- api/test/index.js
const router = require('express').Router()
const hello = require('./hello');

router.use('/hello', hello);

router.all('*', (req, res) => {
    res.status(404).send({ success: false, msg: `unknown uri ${req.path}` });
});

module.exports = router;
마찬가지로 localhost:3000/api/test/hello 인 경우만 라우트하고 아닌 경우 404에러를 준다.
- api/test/hello/index.js
const router = require('express').Router();
const ctrl = require('./ctrls');

router.get('/plz', ctrl.plz);

router.all('*', (req, res) => {
    res.status(404).send({ success: false, msg: `unknown uri ${req.path}` });
});

module.exports = router;
마찬가지로 localhost:3000/api/test/hello/plz 인 경우만 라우트하고 아닌 경우 404에러를 준다.
- api/test/hello/ctrls.js
exports.plz = (req, res) => {
    res.send({ success: true, msg: '여기까지 오느라 힘들었죠?' });
};
굳이 ctrls 모듈을 밖으로 뺀 것은 미리 추후 복잡해질 것을 대비해 계층적으로 나눈 것이다.
eg) /api/data/list, /api/data/add, /api/data/del, /api/data/mod, 추후 늘어 갈 것이며 CRUD로 post, get, put등이 섞이면 관리가 힘들어진다.
여기까지 힘들게 온 길을 간단하게 정리한 방법은
api 최상단에서
- api/index.js
const router = require('express').Router();

router.all('*', (req, res, next) => {
  console.log(req.path + ' welcome to api');
  // 미들웨어가 들어갈 곳
  next();
})

// router.use('/test', test);
router.get('/test/hello/plz', (req, res) => {
    res.send({ success: true, msg: '여기까지 오느라 쉬웠지만 index.js가 더러워지겠죠?' });
});

router.all('*', (req, res) => {
  res.status(404).send({ success: false, msg: `unknown uri ${req.path}` });
});
module.exports = router;
사실 나도 처음에는 api.js 하나에 다 때려 박고 작업을 했었다… 결국 위의 방법은 추천하지 않는다..
uri 테스트
작성된 파일로 서버를 구동하고
localhost:3000/api/test/hello/plz 를 입력해보자
{“success”:true,”msg”:”여기까지 오느라 힘들었죠?”}
localhost:3000/api/test/hello2/plz 등은 404로 안내해줌을 알 수 있다.
페이지가 없을때는 404 지만 내부 오류 일때는 어떻게 될까?
내부오류라 함은 예를 들어 파일을 읽어서 응답을 주려다 파일이 깨진 경우등이 될 수 있다.
exports.plz = (req, res) => {
  throw new Error('서버가 이상함');
  res.send({ success: true, msg: '여기까지 오느라 힘들었죠?' });
});
module.exports = router;
응답을 보내기 전에 throw new Error()를 주게되면 app.js에 있는 최 말단 라우터에 걸려서 해당 이유와 함께 응답을 줄 수 있다.
댓글남기기